
Cinnamon Rolls Recipe
The Perfect Homemade Cinnamon Rolls recipe: Soft, Fluffy, and Never Dry
Have you been disappointed by dry bready cinnamon rolls after thinking oh my gosh this looks amazing and can’t wait to eat it? So have I! But today we’re gonna solve this problem with the ultimate cinnamon roll recipe. These are soft, pull apart into like clouds of amazingness. You’re going to fall in love with them, I promise.
Common Problems with Homemade Cinnamon Rolls
Hey, how to make delicious homemade dishes to share with your family and friends. These cinnamon rolls are calling my name so let’s get started.
The Secret to Soft Pull-Apart Texture
Brian is obsessed in all capital letters with finding like the perfect cinnamon roll, so we’ve been traveling near and far to get some and I’m finally like, I’m just going to make them.
What Makes This Recipe Different
There are a couple places locally that have nice ones, but mine are my favorite, I’ve got to tell you. There’s a lot of fun stuff in there.
Essential Ingredients for Ultimate Cinnamon Rolls
First off, we’re adding three and a half cups or 420 grams of all-purpose flour into the bowl of our stand mixer. I’m using a scale because that is the most accurate and easy way to do it. One teaspoon of salt, a quarter cup of light brown sugar and a quarter cup of granulated sugar, that’s 50 grams of each. One teaspoon of cinnamon and I’m gonna grate just a little bit of fresh nutmeg in here, so that’s kind of up to you. I say a pinch in the recipe but my fingers can hold a lot.
The Role of Sour Cream and Milk
Now onto the wet ingredients. In a medium bowl, we’re going to add half a cup of sour cream, half a cup or 120 ml of milk, a tablespoon of a nice vanilla extract. Now we’re going to give this a really quick whisk. This is going to go into the microwave and if you have a thermometer, take it to 110. If not, you want it to be like, you know, hot when you put your finger in so it’s like not scalding. You want the yeast to be activated. You don’t want it to be like shut down because you’re adding ice cold liquid in there. Very important!
Choosing the Right Yeast
And last but very much not least, we have a package of instant yeast. That’s fast acting instant yeast, not active yeast. It’s the same thing really, but the difference is the granule size. So the yeast are in smaller pieces here; in active yeast, they’re bigger granules so you have to dissolve them in water. Give the ingredients a whisk and set it aside.
The Perfect Cinnamon Sugar Filling
For the filling, I’m mixing three tablespoons of granulated sugar, three tablespoons of light brown sugar, and a tablespoon of cinnamon. Mash it up, mix it up. This is a bowl that’s too small and a whisk that’s too big, but we do what we do. If you have any lumps of brown sugar, you can kind of break them up, but it’s not a big deal because that sugar is going to all melt. Once it’s all mixed up, set it aside.
Butter Quality and Temperature
It just reached 110 degrees. That was two thirty-second bursts in the microwave. I’m gonna add our egg in. I’m also gonna whisk in 6 tablespoons of unsalted butter at room temperature. Give it a whisk, and butter will dissolve. If it doesn’t dissolve, just a little bit more time in the microwave.
Step-by-Step Cinnamon Roll Preparation
I’m all set up with my dry mixture back on the stand mixer with a dough hook attached. So we’re going to add this in here before the mixer runs because it gets a little dicey with this big disk. Run it with the dough hook on low and let the dough come together. It’ll take a minute.
Making the Enriched Dough
This looks pretty good. So right now it’s tacky but it’s not sticking to my fingers. That’s good, and you know it’s falling off the dough hook nice and slow. We really packed this dough with a lot of butter, a lot of milk and the milk fats and everything else, so it’s quite enriched, which means that it is going to be rising up into this cakey amazing wonderful thing. But right now it’s gonna be a little bit sticky and it’s gonna take a little bit longer to rise than if it was just like water and flour.
Kneading and Proofing Techniques
Clean surface right here and now we’re going to give it a nice flowering. Sprinkle, sprinkle, sprinkle. This is a very hungry dough so it’ll be happy to have a well-floured surface. It’s gonna drop out of the bowl almost in one piece and we’re gonna knead it. I’m going to be kneading it until it springs back in the center and you know it has like a nice cohesive silky look to it. It’s not like lumpy and sad.
When I need the dough, I bring it in and push it out, so it’s very tactile and pleasant to do. You’re helping to activate that gluten. It’s nice and warm. Something about warm dough with the yeast, uh, I love it. There’s some bread accounts on Instagram where it’s like the most gorgeous bread and sourdough that’s perfect and they talk about like this and that and that and the proofing and etc etc. Listen, I like nice things as much as anybody else, but if you get like a mindset of things having to be totally perfect, you’re just not going to do them very often.
So we’re going to need this until it springs in the center, and already you can see it’s not like sticking, it’s not sticking to the counter. It’s holding a nice bun shape, and if I press it, it springs back. So we’re almost there. Look at that. Press and spring back. Can you over knead bread? Yeah, I mean, you can overdo anything, but once you see that it’s kind of like nicer and silky and it’s springing back, you know you’re about done. In fact, I’m happy with the way this looks right now and I’m considering it done.
Now it has to proof and it’s going to double and get much bigger in size, so I’m gonna find a nice clean bowl for it and oil it down. I’m just gonna add like a couple drops of vegetable oil here, work it around here and that’s just so the dough doesn’t stick. We want to find a place for it to hang out that’s nice and toasty. You can turn your oven on to 120, let it heat up and then turn it off, pop it in there and that’s usually a nice place for it to go. Or if you have a warming drawer, use that, and if anything else just, you know, maybe put it on a couple towels so it’s not right on a stone countertop.
I’m going to check back on this in about an hour and a half and see where it is. You can cover your bowl with plastic wrap, a damp towel, or one of these little reusable bonnets which I bought and love. So just pop this on and it’s going into my oven that’s turned off but like nice and toasty.
Rolling and Filling Tips
Oh but before I flower this, I want to show you what happened. Oh hello! Remember that cute little baby? It’s all grown up now. And this did take a minute. It was almost three hours, although I was kind of like having dinner and enjoying myself for a minute. So I came back to this. This recipe takes a while longer to rise up than the sad dry bready cinnamon buns because this is just packed with butter and like the sour cream and all these delicious things that enrich the bread. Just the yeast has to work a little harder and longer. So sorry, yeast.
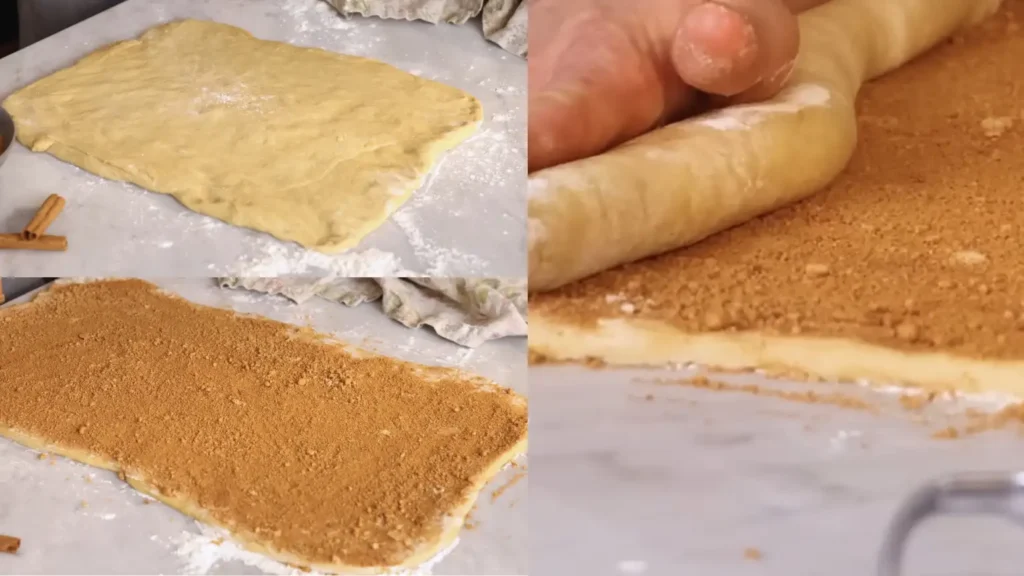
Let’s punch this down. The punching just releases the air bubbles a bit, and then flip it out. Flour the top as well and now we’re going to roll it out kind of into a rectangle. This is where you want to be a strategic roller and try and really get some corners pulled out so you can, you know, do some kind of pizza action over here. You can see those little pieces of nutmeg.
I’m going to roll this out nice and thin. It will puff up overnight and, you know, kind of the bigger it is, the more rolls you’re gonna get. I’m gonna go grab some very room temperature butter, like soft pliable butter. Be right back.
This is the butter you want. Look at this. This is nice and soft, nice and spreadable. I should say the recipe calls for four tablespoons of butter, but if you roll out an extra large sheet, you might need some more. It’s not a big deal. So I’m using a small offset spatula, but you can use a knife or a large offset spatula, whatever makes you happy to spread some butter out. I don’t need that much. I just need enough to kind of hold the sugar and make everybody happy.
Now we liberally sprinkle this, liberally sprinkle this with our cinnamon sugar, and as you can see, we ended up using all of that cinnamon sugar. What we’re going to do is roll this up. So start off right at the edge and you want a nice tight roll, so just take a moment and kind of work it. Work it, work your, work your, work work. Good. And now what bugs me is when there’s like a little gap in the cinnamon sugar and you can’t see the full roll. Ah, there’s one of those times where it’s totally okay to be all in your feelings for, I don’t know, cinnamon rolls, because if I have control over the cinnamon roll, everything’s gonna be okay.
All right, now just roll, but then make sure it’s tight. Don’t get too loose here. So just as you go, pull it back if you feel that it’s getting loose. This is a big cinnamon roll. Okay, now it’s all being nice and smooth. Ah, oh my gosh, this makes me so happy. I can’t even tell you!
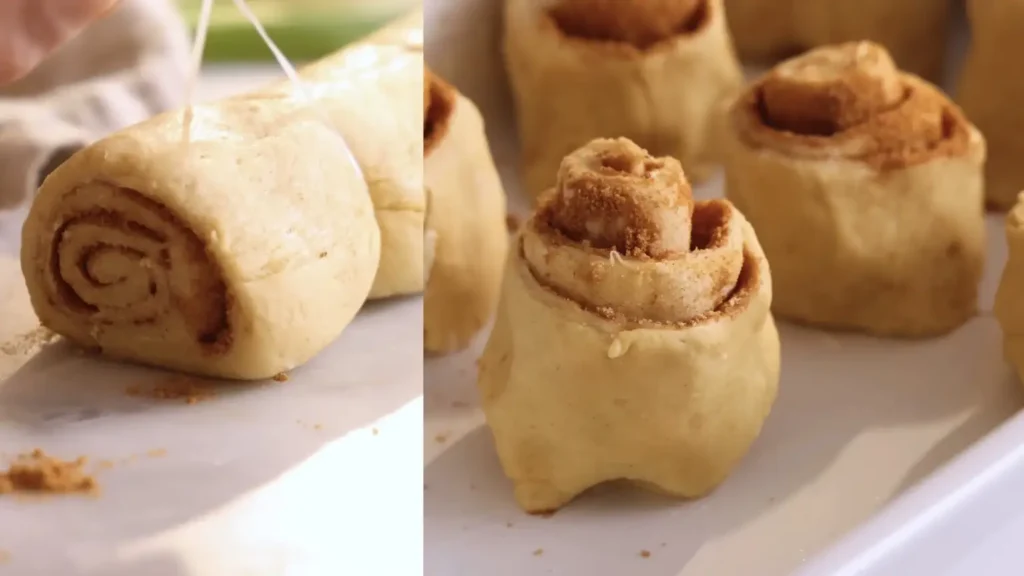
The Dental Floss Cutting Method
How do you cut your cinnamon roll? This is like so narrow, so small. What you do is you can either use a sharp knife or, if you want to be a genius, just use dental floss. It’s so easy that way. You should also get your buttered baking dish ready. I’m using like an eight by eight-ish dish. It has rounded corners so it’s hard to be specific.
We’re using some dental floss to get nice clean cuts with no knives on your counter, and I’m going to cut them about every two inches or so, maybe a little bit less. The first ones that, oh! Have a beautiful spire in the center. These are going to have lots of rolls just the way I like it. And you can use, use the last one as a guide so they’re all basically the same height. This reminds me, I’m going to floss tonight. If you’re using a knife to cut them, you kind of have to de-smush them, so this is just an easier way to have that nice beautiful roll. I mean, look at that! But who would say no to this? Huh? So excited for you. And you can let me know in the comments if you enjoy cinnamon rolls like year-round or if it’s only like during the holidays or like special occasion like somebody’s birthday.
All right, so I greased up my baking dish with butter, not grease. Hello. And now I’m going to plop these in. They will expand, so you do want to give them some room to grow. So try and not smush them too close together.
Overnight Rise vs. Same-Day Baking
In a pinch, you would probably leave it overnight. What we’re gonna do is make the cinnamon rolls and leave those overnight because they’re like overnight rolls. Honestly, in the morning nothing happens before my coffee, but I could pop something into the oven.
Benefits of the Overnight Method
After your rolls are in your greased baking dish, you can do one of two things: let them rise in a warm place for like one to two hours, you’ll see them kind of like puff up in size and know they’re ready to go into the oven. Or if you’re like me, what you can do is cover them tightly with foil and then place them into the fridge overnight.
Morning Baking Instructions
As soon as you wake up in the morning, take them out and place them in a warm cozy place. You can do the oven trick again with 100 degrees situation, and then we’re gonna come back. So the magic of editing, I’ll see you in the morning.
Same-Day Timeline and Tips
Good morning! When I woke up, first thing I popped these into a warm place. I actually put them in the warming drawer. I didn’t realize there was one over there, but there is. So and they went for like an hour and a half, two hours, and they warmed up, they puffed up, and this is the result.
How to Know When They’re Properly Proofed
Look how beautiful that is. This is like, uh, amazing. They’re gonna go into the oven now at 350 for up almost half an hour. After 20 minutes, if you see the tops are browning a bit, just pop the foil back on just loosely like that, and it’ll let them bake up but they won’t get too brown. Into the oven you go!

Cream Cheese Glaze and Serving Suggestions
While the cinnamon rolls are baking up and smelling delicious, we’re going to be whizzing up some super easy cream cheese glaze.
Perfect Cream Cheese Glaze Recipe
So into our processor, and I have my little, it’s like a little mini bowl inside of that because I’m not making that much, two tablespoons of room temperature butter, four ounces of cream cheese in you go, a nice pinch of salt, a teaspoon of lemon juice – fresh please. I’m going to add in a tablespoon of a nice vanilla. Finally, one tablespoon of milk. Okay, pop this on, whiz up, and we’re going to add more milk as needed for a nice consistency.
Glaze Consistency Tips
Oh you know what I forgot? I forgot the sugar, people! Two things: one, you could make this the night before when you’re a little bit more fresh. Hello! I cannot believe I was gonna not add sugar to this. Huh. And always taste test what you have before you’re finished. All right, pulse this in, right? This gets set aside until my buns are ready.
When they are almost done, my cinnamon rolls baked for just over half an hour, like 33 minutes, and 20 minutes in I tinted the sides like this. Tenting is just covering loosely with tin foil so these end pieces didn’t get burnt, but the center still had time to rise up and bake through.
Serving Temperature and Storage
Now what we’re gonna do is cover these cinnamon rolls with a little bit of frosting. That’s a little bit. And just smooth it out, let it fill in. Oh my gosh, I wish you could smell this. It makes me, it makes me so happy. God, it tells you if you’re making this for a brunch, everyone’s gonna be your new best friend.
You could totally serve this ASAP right away, but you know it’s a good idea to let it just cool down a bit because it’s going to be like molten hot inside. So give it a rest. We still have a good amount of frosting here, so when we’re done, we can do one final just little extra glaze, and I like to do it on each individual servings. The glaze is kind of dripping down the sides and like nice and gooey.
Pairing and Serving Ideas
Not too hot. Cinnamon rolls have cooled down sufficiently, and I’m ready to get into this. Who could say no to a little bit more glaze? Can you tell I like cream cheese frosting?
I am so ready for a bite. I can’t even tell you. But if you like this recipe, check out my chocolate chip banana bread recipe. It is everything you want from a banana bread and more. I promise. Also, there’s like no leavening time, so you can have it right away.
Brian better come out here and claim some of these cinnamon rolls right away because I’m about to do some major damage.
1 thought on “How To Make Amazing Cinnamon Rolls Recipe”